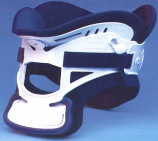
Moving and handling the child with suspected/diagnosed spinal injury: application of Miami-Jr and Miami J collar, Standard Operating Procedure

Warning

Objectives

  • To provide a consistent approach to the procedures of cervical spine immobilisation including, where clinically instructed, the application of a two piece cervical collar
  • To prevent spinal cord injury and/or ascension of injury.

Scope

This guideline is intended for all healthcare professionals caring for children with suspected/diagnosed spinal injury within PICU at the Royal Hospital for Children, Glasgow.

Audience

These guidelines are designed as a learning aid - not as a substitute for training. All medical, nursing and allied health professionals caring for patients who have suspected/diagnosed spinal injury should be familiar with these guidelines.

If any child has trauma to the head and/or multiple trauma,injury to the bones & ligaments of the cervical spine and/or injury to the spinal cord should be suspected.

Suspicion of Injury

Cervical spine injuries should be suspected in all children admitted to the paediatric critical care unit (PICU) with:

  • Significant accident history- sudden impact, collision, deceleration, fall from height or ejected from vehicle, diving.
  • Severe head injury i.e Glasgow Coma score (GCS) of 8 or less
  • Trauma to vertebral column
  • Neurological symptoms of spinal cord injury
  • Injuries above the clavicle
  • Altered level of consciousness after trauma
  • Cervical spine surgery

[Harrison 2000, Meckler et al 2014]

N.B. Any child with a suspected or proven spinal injury:

Cervical immobilisation should be used to prevent secondary injury, or until such an injury has been ruled out, by appropriate clinical assessment and (where indicated), imaging [NICE 2016, RCEM 2017].

If a cervical spine injury is suspected or confirmed, the cervical spine should remain immobilised until the child is awake, moving all four limbs, with no parasthesiae or numbness,  and can tell us that he/she has no pain in the neck or spine. This may be more easily confirmed in older children, than in the younger child/infant. Remember, distracting injury may interfere with reports of neck pain.

In-line cervical spine stabilisation should be discontinued only with consultation between the consultant intensivist and the consultant responsible for the child’s care.

The assessment of the spine for potential injury is the responsibility of the consultant under whom the patient has been admitted. This assessment should be formally documented in the case notes.

Paediatric neurosurgery will only review a patient if:

-  the child has a confirmed injury to either the bony spine or the spinal cord on imaging

- the child has a persistent neurological deficit consistent with spinal cord injury despite normal imaging. 

Cervical spine immobilisation

In the conscious child:

  1. Manual in-line immobilisation (MILS) should be applied [APLS 2015, EPALS 2016, RCEM 2017].
  2. If MILS cannot be maintained at all times, a properly fitting collar, applied by a competent practitioner (and where tolerated), should be considered.
  3. The child should never be restrained / secured by having their head taped to the bed / safety rails in any way
  4. All spinal head blocks should be removed

In the unconscious child:

  1. Where MILS cannot be maintained, immobilisation should be with a properly fitting collar (E.g. Miami Jr.) applied by a competent practitioner.
  2. In the sedated/unconscious and non-combative child, RCEM, EPALS & APLS guides suggest that blocks and tape may also be considered to provide additional stabilisation during resuscitation, clinical stabilisation and safe transfer of the child. However, blocks and tape should not be used routinely on PICU if a properly fitted collar is fitted.
  3. The child should be nursed supine on a normal bed in the Miami-Jr/Miami-J collar.

Prior to and throughout the procedure of collar fitting, the practitioner should ensure that clear explanation and reassurance is offered to the child, and parents if present.

* Exceptions

A pragmatic approach must be used with children in whom attempts at immobilisation may cause significant distress and agitation, such that harm may result (RCEM 2017).

Two groups of children cause particular difficulty:

The first is the frightened, uncooperative child; the second is the child who is hypoxic and combative.

In both cases, overzealous immobilisation of the head and neck may paradoxically increase cervical spine movement. This is because these children will fight to escape from any restraint.

Combative children need senior assessment as to whether the collar is required. If the senior clinician deems cervical spine immobilisation is required, then use manual in-line stabilisation and reassurance from a parent/caregiver.

Two-piece collars (such as Miami-Jr/Miami-J) may be better tolerated than one-piece collars (R.C.H. 2017).

In such cases, a hard collar may be applied, and NO ATTEMPT MADE to immobilise head with head blocks or sandbags.

NOTE: **The Advanced Paediatric Life Support group (APLS) & Resuscitation Council (EPALS) no longer recommend a blanket use of C-spine collars. However, manual in-line stabilisation (MILS) is retained, as the APLS course still recommends concern about c-spine injury. [APLS 2015]

Procedure: Cervical collar application

A correctly fitting rigid collar only provides between 40-80% restriction of neck movement when used on its own (Gavin et al 2003, Tescher et al 2007, Holla et al 2016). Those children with a suspected spinal injury and in a medically-induced coma, may need application of a collar (where clinically instructed), with the collar allowed to be loosened only when the child is on neuromuscular blockade (see RHC PICU: Traumatic Brain Injury guideline 2012).

If the instruction is to apply a cervical collar, then the cervical collar must fit correctly. If it is too small, the head may become flexed on the spine, if too large, the neck may be able to move in any direction and therefore the cervical spine is not immobilised [EPLS 2012].

Three health care professionals are normally required to apply a two-piece cervical collar. (see following pages).

*The following is for an unconscious or calm/cooperative non-combative child

The Procedure*

The child should be told what is happening even if he/she appears to be unconscious. When using the Miami-Jr/Miami-J collar, follow the: Size it up, Scoop it up and Snug it up procedure (©Ossur)

two photographs demonstrating positioning of child with head neutral and then with jaw thrust

  • Person 1 Ensure manual in line cervical stabilization is maintained throughout. A jaw thrust could be adopted with the head held in the neutral position and the cervical spine immobilized, without extension of the head, i.e. the cervical spine is kept in-line with the rest of the spine. (See photos above).

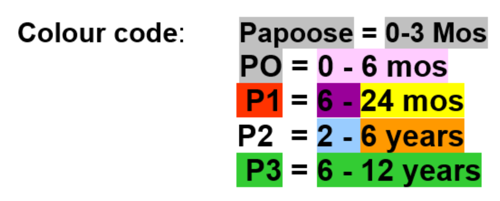
  • Person 2 Size it up: Using the manufacturer’s method, select a correctly sized collar. Collars are colour coded according to size and are available in the PICU store cupboard (see below)

SIZING

Child UNDER 12 years old

Use Miami - Jr chart below

Miami Jr chart with sizing(©Ossur)

Colour codes for collars

  • Size it up: Once colour coded size collar chosen, fully unfold the collar and identify Back and Front pieces.
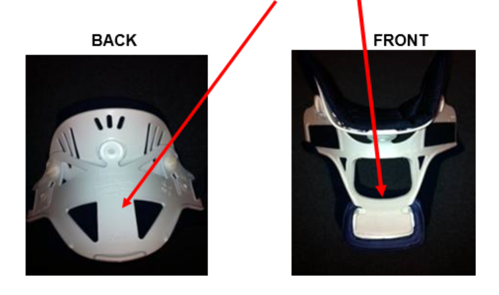
    Photos of the back and front of the collar demonstrating how to identify correct side
  • Check child supine and head centrally aligned, and that child’s thorax is at appropriate height to accommodate the occipital prominence (this may require the use of a back pad such as Occian® AirWay pad™).
  • Taking care not to cause movement or drag on the neck, slide the BACK of the collar behind the neck, push it down gently into the bed as you pass it through
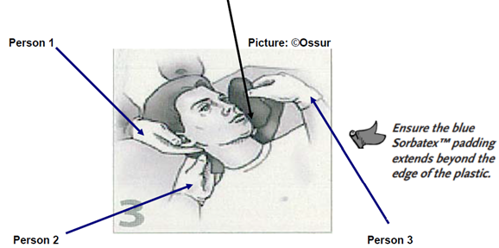
Diagram showing correct positioning for putting on collar

When using the Miami-Jr collar you will need a third person to assist with this (see above)

  • Scoop it up: Once the Back piece of the collar is in situ and symmetrical, take the Front piece of the collar with both hands. Flare the sides of the Front of the collar and slide the collar UP the chest wall. Scoop the collar up under the child’s chin until the chin is seated in the centre of the chin piece (see picture below)

Diagram showing correct positioning for putting on collar

  • Ensure the sides are oriented up towards the ears and off the trapezius. Note: Picture below rotated to show clearer positioning of collar. In PICU, child will be supine with manual in-line stabilisation.

Diagram showing correct positioning

  • However, before the collar is fastened, the neck should be inspected for distended veins, tracheal deviation, wounds or subcutaneous emphysema. If possible, use a collar that allows the trachea to be seen and felt.
  • Snug it up: Curl the ends of the collar so that they touch the neck. Fasten the Velcro strap and ensure symmetrical alignment and oriented as "Blue-to-Blue" to Front Velcro.

Diagram showing how to fasten collar

  • Tighten Velcro straps alternately and check no gaps. 
  • NB: if the child can slip his/her chin inside the collar IT IS NOT SNUG ENOUGH.
    Wrong fit:Illustrations of a collar which is too small and one that is too large
  • Reassess the correct fit of the collar. If the fit is correct secure the joining device.

Photo of a collar that fits correctly
Just right!

  • If the fit is wrong, have Person 1 maintain manual cervical in-line stabilization, remove the collar, taking care not to cause neck movement. Select the correct size and recommence the procedure.

SIZING

Child OVER 12 years old

  • Check Miami-J chart below to see which collar might be most appropriate
    Miami J sizing chart
  • NOTE:     Although the 250 XS is required by only 5% of the adult population, it is likely that many of our children over 12 in PICU will fit this collar. However, there should be at least one of each of collar sizes – 250 XS, 300 Small, 400 Medium, 500 Large - available in case required.

    • Size it up: After checking chart above select collar required. Or use a quick size check:
    • Use your fingers to measure the vertical chin-to-shoulder distance
    • On the collar, this measurement corresponds to the distance from top of hook & loop strap to bottom edge of collar plastic (see below)

Diagram showing how to use fingers to measure correct sizing

  • If deciding between two consecutive sizes, try the smaller size first.
  • Use the largest size that fits comfortably and maintains correct immobilisation

NOTE: Miami-J collar Front & Backs sizes are interchangeable (i.e. fronts interchangeable with other fronts & back interchangeable with other backs). However, this is rarely necessary.

  • Fully unfold the collar and identify Back and Front pieces
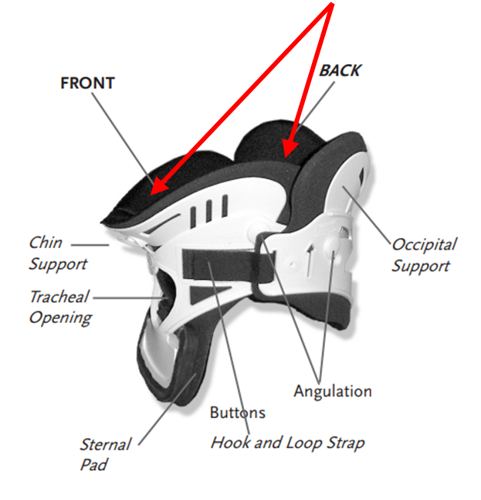
Labelled diagram of the collar showing the front and back

  • Check child supine and head centrally aligned.
  • Taking care not to cause movement or drag on the neck, slide the BACK of the collar behind the neck, push it down gently into the bed as you pass it through.
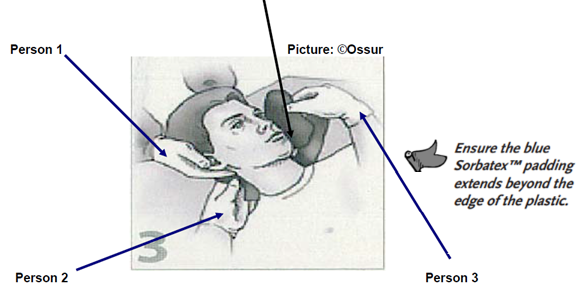
When using the Miami-J collar, you will need a third person to assist with this (see above)

  • Scoop it up: Once the Back piece of the collar is in situ and symmetrical, take the Front piece of the collar with both hands. Flare the sides of the Front of the collar and slide the collar UP the chest wall. Scoop the collar up under the child’s chin until the chin is seated in the centre of the chin piece (see picture below)
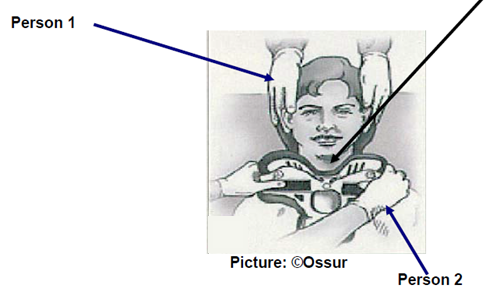
  • Ensure the sides are oriented up towards the ears and off the trapezius. Note: Picture below rotated to show clearer positioning of collar. In PICU, child will be supine with manual in-line stabilisation
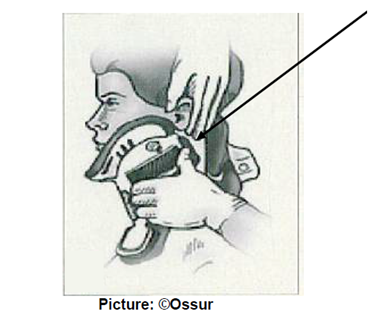
  • Place Front of collar inside the Back. Apply hook & loop strap one side of collar then the other (see below)
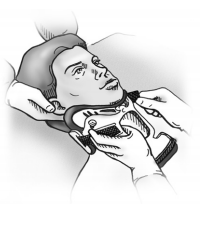
  • Snug it up: Curl the ends of the collar so that they touch the neck. Fasten the Velcro strap and ensure symmetrical alignment and oriented as “Blue-to-Blue” to Front Velcro.
  • Tighten alternately to achieve an equal length on both sides
  • When the child’s collar is properly fit, there should be equal amounts of excess hook & loop overhanging the Front blue adhesive sections (see image below)
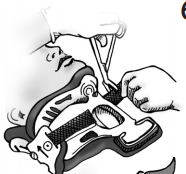
Final adjustments:

  • This can be done using angulation buttons to ‘fine tune’ the fit of the collar.
  • Position of buttons: 12 & 6 o’clock = unlocked……3 & 9 o’clock = locked (see below)
  • These adjustments may help reduce pressure on critical points such as chin and occiput.

N.B. It is easier to adjust the Angulation buttons when Front of collar is off child

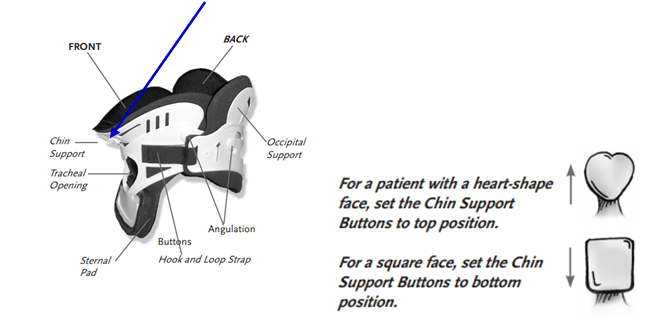
  • Adjustments for chin support:

  • Adjustments for occiput support:
  • For supine patients keep Occipital support buttons set to TOP position (this directs top edge of collar shell to bed)
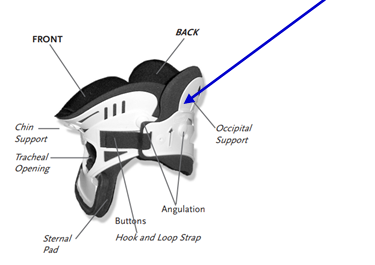
For BOTH Miami-Jr and Miami J check:

  • Collar hook & loop straps are oriented ‘blue-on-blue’ with both tabs equal length
  • Sides of Back overlap sides of Front
  • Front of collar angled up toward ears
  • Chin centred comfortably and does not extend over edge of Sorbatex™ pad OR fall back inside collar
  • Plastic edge of collar should NEVER rest on child’s clavicles
  • No plastic should touch child’s skin – Sorbatex™ pads should always extend beyond all plastic edges
  • Tracheal opening & posterior vent should sit ‘midline’
  • Collar is not too tight or fit too closely to neck. If needed, size up to next taller size.

*N.B. If you have problems with fitting your patient with any of these ‘off-the-shelf’ collars, or your patient requires ‘bespoke’ collar fitting or any other issues, you can  contact Paediatric Orthotics for advice (Mon-Fri).

Orthotics department
Clinic 12 Therapies Hub
Royal Hospital for Children
0141 452 4651

Editorial Information

Last reviewed: 01/02/2019

Next review date: 01/02/2022

Author(s): J Grady.

Approved By: Clinical Effectiveness

Reviewer name(s): PICU Guideline Group.

References

Advanced Paediatric Life Support (2015) The structured approach to the seriously injured child: Cervical spine. APLS 2015, Ch. 13, pp. 144.

Davidson, M  Choudrey, V (2015) Trauma team triggers. Royal Hospital for Children, Glasgow. 

Davidson, M  Choudrey, V (2018) Trauma team roles and responsibilities. Royal Hospital for Children, Glasgow. 

European Paediatric Advanced Life Support (2016) In-line cervical spine immobilisation. EPALS (4th Ed). Resuscitation Council, London.

Gavin, TM  Carandang, G  Havey, R  Flanagan, P  Ghanayem, A  Patwardhan, AG (2003) Biomechanical analysis of cervical orthoses in flexion and extension: A comparison of cervical collars and cervical thoracic orthoses. Journal of Rehabilitation Research and Development, Vol. 40 (6), pp. 527-538.

Foster, S (2017) Head injury guideline (Emergency department). Royal Hospital for Children, Glasgow.

Harrison, P (2000) Managing spinal Injuries: critical care. The initial management of people with actual or suspected spinal cord injury in high dependency and intensive care units. Spinal Injuries Association. SIA:London.

Harrison, P ‘MASCIP’ (2015) “Moving and Handling Patients with Actual or Suspected Spinal cord Injuries”. Produced by the Spinal Cord Injury centres of the United Kingdom and Ireland.

Holla, M  Huisman, JMR  Verdonschot, N  Goosen, J  Hosman, AJF  Hannick, G (2016) The ability of external immobilizers to restrict movement of the cervical spine: a systematic review. European Spine Journal, Vol. 25, pp. 2023-2036

Meckler, G  Leonard, J  Hoyle, J  (2014) Pediatric patient safety in emergency medical servicesSemantic Scholar, Vol. 15 (1), pp. 18-27.

NICE. (2016) NG41 Spinal injury: Assessment and initial management. National Institute for Clinical Excellence. London:UK.

Ossur (2018) Miami J Collar: Competency interactive training course

Ossur (2018) Miami J Collar: Sizing and application instructions

Ossur (2018) 12yr PLUS: Sizing Miami-J:  and Fine tuning Miami-J

RCH. (2017) Clinical guideline: Cervical spine assessment. The Royal Children’s Hospital, Melbourne. 

RCEM. (2017) Position Statement: Paediatric Trauma – Stabilisation of the Cervical Spine. The Royal College of Emergency Medicine, London:UK.

Tescher, AN et al (2007) Range-of-motion restriction and craniofacial tissue-interface pressure from four cervical collars. The Journal of TRAUMA® Injury, Infection and Critical Care, Vol. 63 (5), pp. 1120-1126.